16.11.11

Tutorial Tuesday - How to Glass Paint

Finally!  As you requested, I have created a short video tutorial showing you how to paint on glass.

With the holidays coming up, knowing how to paint on glass comes in handy.  You can make your own ornaments and create unique, personalized gifts for your loved ones.

I use a specific brand of glass paint called PEBEO 160.  There is also Pebeo 150, but that is used mainly for porcelain.  You can get them at Michaels craft stores, but I buy mine at dickblick.com.  Sometimes the product is old at the craft stores and difficult to use.

I use their glass paints, paint markers AND cloissone tubes.  The cloissone gives a raised, 3-D effect to whatever you are painting and it helps to add definition where you need it.


Quick Tips-
  • Paint glass in LAYERS.  Do not try to make it the color you want with the first layer.  It will look gloppy (is that a word?) and will take forever to dry.  Be patient and layer your colors, waiting 2-5 minutes per layer.
  • If you are painting a bold, solid color on clear glass, do one to two layers of WHITE first.  This will make the colors really pop.  If you are going for a very transparent look, then this step is not needed.  Layering with white first helps with painting on dark glass as well, like wine bottles, so that the colors stand out from the color of the glass.  Glass paint is transparent, so it is a little bit different to work with.
  • Consider using blue iridescent paint to add shimmer to your projects.
  • Use synthetic soft bristle brushes.  Do not use cheap, hard bristle brushes as the bristle marks will show up in your paint.  Get a variety of brushes-  flat round-ended for flower petals, angled brushes, large flat brushes for large surface painting and small rounded detail brushes.  
  • Get a bottle of the clear glaze that Pebeo makes.  The clear glaze creates a brilliant finish and deepens colors that appear matte.  It also works as a medium to hold glitter if you are adding glitter to ornaments or whatever...
  • Pebeo 160 paints need to dry for 24 hours and then you bake the items at 325 for 40 minutes.  If you want to add to your design or start over, you can, as long as you have not baked it yet.  Just scrub hard with water and the design will come right off and you can being again.
Please watch the video for more details.

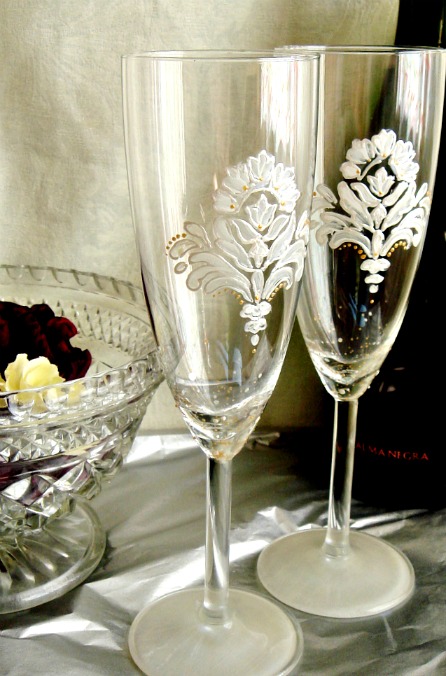
Here are the finished champagne flutes that I started on the video:

Also, here are a pair of flutes where I used the stencils you saw on the video:


Happy Crafting!!

9.11.11

Attention Crafters/Painters! Dick Blick is having a sale!

Hey just wanted to quickly let my fans know that DickBlick.com (huge arts and crafts supplier) is having a sale where it is 10% off $99 and FREE SHIPPING.  You can also upgrade your shipping for just a few dollars to receive items even more quickly.

Their pricing is so much lower than most craft stores anyway.

I am a little behind on writing posts, but I will catch up soon.  I have a ton of orders in my sugarcraft shop and my glass shop ON TOP OF Christmas inventory so I fell behind...

Good stuff coming up on tutorials!
xo
Sonja 

19.10.11

Inspiration - San Antonio Riverwalk

San Antonio, TX is an amazing city with a diverse culture rooted in American, German and Mexican heritages.
We visited the famous Riverwalk last week and it is so incredibly lovely.
If you go, definitely take time to walk the entire Riverwalk or take one of the barge tours.  The great thing about walking the river is that the upper level of the city's downtown is  so accessible for sightseeing or shopping.
After winding around the river for a while looking at trees, plants and even a waterfall, we walked up the amphitheater steps to see La Villita, The Little Village. 

La Villita is San Antoino's very first neighborhood.   It is now an art community and unique shops inhabit old adobe homes and victorian-style homes.  The air was thick with incense and the morning sunlight was soft in the trees.  When the shops are first opening, the little village is quiet and calm...

I wanted to sit right down and start painting, but with two kids along for the ride, that was a no-go, lol.

Still, after getting home, I feel refreshed and inspired.  If you need to get away for inspiration or a place to soak your senses, San Antonio's riverwalk is a fantastic place to go!

I included a ton of pictures just for you...

Happy Crafting,


Hand Painted wooden animals from Oaxaca, Mexico


17.10.11

New Look!

Hello Everyone,

My blog finally got a much needed make over!  Sorry for all the switching around, but it takes some time to figure out how you want things to look.

I want my readers to find value and inspiration here, so really, post a comment here about what you would like to see more of!  Is there something you want to learn or see?  Do you need ideas for an upcoming party?  Do you know of a crafter who gives back with his or her talents?

You can always just stop by and say, "Hi" too.  :-D


Happy Crafting!

14.10.11

Tutorial Tuesday - How to Make Fairy Furniture - Fairy Princess Bed


Well, again, my Tutorial Tuesday is a bit late, but when you have kids and a busy family life, sometimes your creative endeavors get put on the back burner.

Anyway, with my 'pot still simmering', I will bring it to front burner now and share how to make a Fairy Princess Bed!

It is very simple and I always use bits and pieces of crafting materials I have in my crazy craft closet.

 Quick Tip-  Re-use those plastic baby wipe containers for crafting scraps!  I have them labeled for ribbon, flowers, beads, stamps, etc.


You will Need:
A small jewelry box with lid
Ribbon
Scissors
Flowers (Dried or Fake-  I use fake when making something for kids so that it can withstand play)
Hot Glue Gun- I use a high-temp gun, but if you are not used to working with one, use a low-temp gun!
Decorative Paper


1.  First, take your jewelry box lid and cut only one side of it and remove that end.  See photos:

2.  Attach the lid to the box as this forms a tiny headboard.
3.  Measure the decorative paper and cover the inside, bottom, back and sides of the box.  Remember that you will be adding ribbon and flowers, so it is not necessary to totally wrap everything, just cover what you know will show through the ribbon and other decorations.

4.  After adding the paper, just start covering the bed in layers.  I used the ribbon with beads next and wrapped the edge of the bed in the first layer of ribbon.  Then, I started to picture where the flowers should go and put the first ones on.
4.  I decided to add more layers of ribbon and of course, more flowers.  I added the dark green leaf to form a canopy over the bed.  It is attached on the top-underside of the headboard.
5. To brighten up the bed, I attached one more flower and made it orange and yellow.  Then finally I filled the bed with hydrangea blossoms.


And that is it!  A lovely little fairy princess bed for your own fairy princess.

:-D
Happy Crafting!

Giving Back - Helping Dogs in Need

A few weeks ago, I was teaching a class at House Wine and they were having a fundraiser to benefit Austin Dog Rescue.
I thought, surely I can contribute something to the cause, so I created a pair of wine glasses to raffle off that night, complete with a quote for dog lovers; "A dog is the only thing in the world that will love you more than you love yourself". 
We raised $180 in raffle ticket sales on top of the proceeds House Wine donated that evening.
After the fires around Austin, the dog rescue centers are a maximum capacity and even sending some dogs to foster homes.  They need help!
For just a few hours of my time, some dogs will get much needed food and shelter.  It was cool that one of the Emergency Fund volunteers won the glasses.

Big News- I am donating a hand painted lamp and set of wine glasses at the Third Annual Dogtoberfest on October 22! 

Craftivism in Action feels so good.  :-D

Happy Crafting!

7.10.11

Inspiration - A great quote for starting a new crafting adventure


 For all my fellow crafting peeps...

“Nobody tells this to people who are beginners, I wish someone told me. All of us who do creative work, we get into it because we have good taste. But there is this gap. For the first couple years you make stuff, it’s just not that good. It’s trying to be good, it has potential, but it’s not. But your taste, the thing that got you into the game, is still killer. And your taste is why your work disappoints you. A lot of people never get past this phase, they quit. Most people I know who do interesting, creative work went through years of this. We know our work doesn’t have this special thing that we want it to have. We all go through this. And if you are just starting out or you are still in this phase, you gotta know its normal and the most important thing you can do is do a lot of work. Put yourself on a deadline so that every week you will finish one story. It is only by going through a volume of work that you will close that gap, and your work will be as good as your ambitions. And I took longer to figure out how to do this than anyone I’ve ever met. It’s gonna take awhile. It’s normal to take awhile. You’ve just gotta fight your way through.”
Ira Glass


Can you relate?  I know I can!